
 | ||||||||||||||||||||||||||||||

Polarity Squatting Exercises
Please be self-aware. These exercises/yoga postures are used daily by many people, but if you have doubt about your ability to carry them out, or the advisability of doing so, please check with your doctor before starting. I, Carrie Thomas, am not a doctor, so I have no expertise in diagnosing, or in knowing the likely effect of any specific exercise on your medical condition/s.
When participating in any exercise program, there is the possibility of physical injury. Always stay comfortably within your limits, starting in small stages and building up gradually to longer times and lower stances. Go as far as a 'nice stretch', not as far as any pain. Forget 'no pain no gain', instead love yourself and your body and keep well within its limits and your enjoyment level. If a certain posture doesn't suit you, don't do it. You are your body's best friend, listen to it, don't push or force it. If in doubt, don't. If in doubt...IMAGINE doing them, that can also help. Link to my Polarity Therapy page.
What are Polarity exercises?
Dr Stone took a holistic approach, advocating a good lifestyle as well as receiving therapeutic moves. Drawn to yoga, he was keen that exercises (postures) be used to promote health at an energy as well as physical level. In particular squatting postures, and their associated stretches, were favourite practices to remove energy blockages and keep the body's systems working beautifully. Let's now look at some of these, more information can be found in Dr Stone's works, especially recommended are the final chapters in his book 'Health Building: the conscious art of living well'. ISBN 978-1-57067-081-7 Published by Book Publishing Co with CRCS. Note any of Dr Stone's words quoted on this page is taken from that source, unless stated otherwise.
Health Posture
Basics & foot positioning: wear loose clothing; keep your feet flat on the floor at all times, start with the feet together then turn the toes out so that the feet are not more than at right-angles to each other, now slid the feet apart until they are about 6" / 15cms apart at the heels
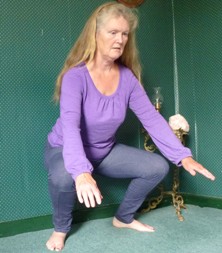 |
Prepare by rocking up and down slowly getting as low as you can, keeping your back fairly straight. With time you will be able to squat closer to the ground. Remember to keep your heels on the floor. Difficult? Here's two hints. You could wear shoes to start with, to benefit by the slight heel, or use something under each heel to raise them slightly, books perhaps. Is it best to use something under the heels or just to not squat so low? I'd suggest doing both, no heel-lift will give maximum stretch to calf and other muscles, yet using a heel-lift allows you to enjoy other benefits of the lower posture. With practice you'll naturally get lower.
|
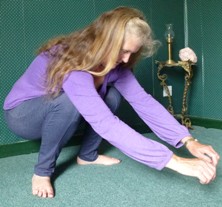 |
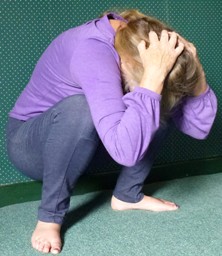
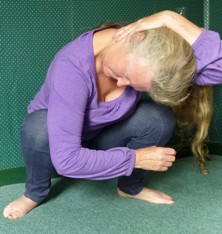
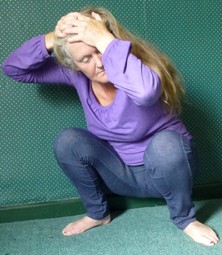
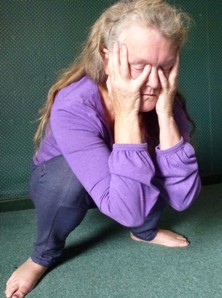
Go
down as far as possible, ideally with knees fitting under your armpits. Keep
arms gently stretched out but not touching the floor. Now gently rock! It's easier to hold the position whilst rocking, different muscles feel the stretch that way, so little movements side to side and back and forth, perhaps circling. Now you could do a little twist, around the axis of the spine. |
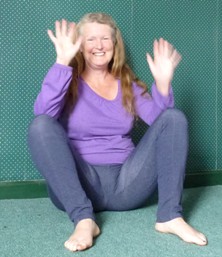 |
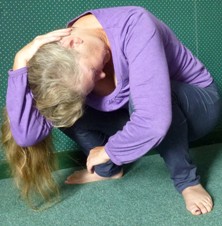
Oops, how do I keep my balance?
It's falling backwards that happens, isn't it? Dr Stone advocated plenty of
room behind you...and perhaps a comfy rug. Personally I like to work in front of
my settee which is nicely padded just where it matters if I roll back into it.
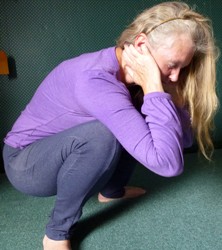
And know you're in good company....I used a 10 second delay to take these photos with my camera, and look....one shot got me just after I'd tumbled back against the wall! Be careful about such hard surfaces, they can catch you in the wrong places if you do loose your balance. If you need extra support to start with, you could work in front of an open door, holding the door-handles on both sides of the door for support. |
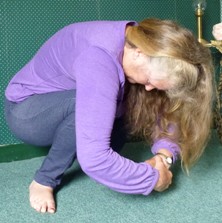 |
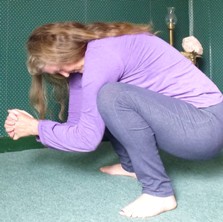
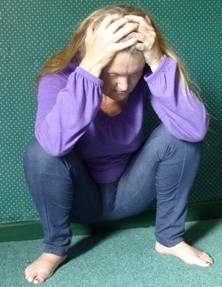
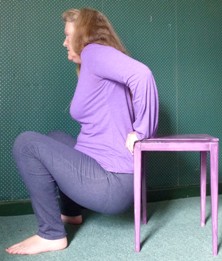
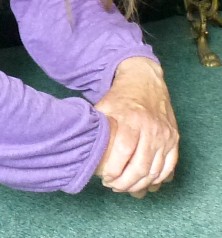 Now, let's move onto the second of the Health Postures. This time squat with your arms around the knees, one hand around the other's wrist. Use your arms to gently squeeze your knees together as, once again, you rock in all directions. Drop your head forward. How tightly do I squeeze? Hardly at all, Dr Stone used the phrase 'playful exertion'. Feel the pull between the shoulders. Now, take deeper breaths and notice how the in-breath does the work of opening through your back, and it's good to allow a natural grunt with the out-breath. |
For how long do I hold these Health Postures? I'd suggest doing them for about a minute each. If you're enjoying it, keep going!
Youth Posture
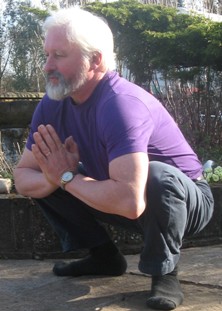
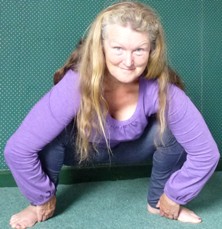
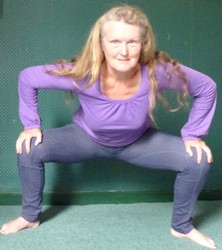
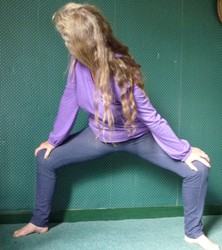
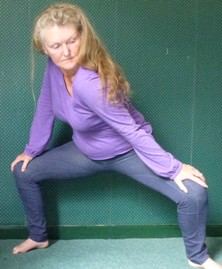
Basics & foot positioning: This is a WIDER FOOT POSITION THAN THE HEALTH POSTURE, again wear loose clothing; keep your feet flat on the floor at all times, start with the feet together then turn the toes out so that the feet are roughly at right-angles or more to each other, now slid the feet apart until they are AT LEAST 12" / 30cms apart at the heels. The heels are roughly your chest or hip distance apart, at a distance that is comfortable for you.
The name 'youth posture' reminds us that young children often use these stances naturally.
 |
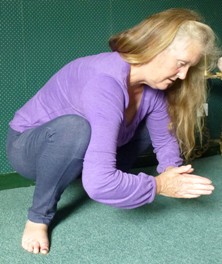
 With this wider posture, your pelvic area is allowed to open. Your arms are inside your knees, exerting a gentle push outwards, thus stretching a different set of muscles. Cup one hand in the other, with thumbs left free. Drop your head forward, supported by the thumbs in the ridge between the eyes. Again, rock in all four directions and twist. |
 |
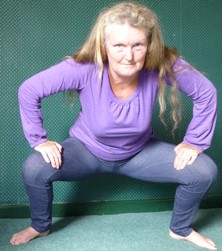
Here are more variations of this basic youth posture with the arms inside the legs, these first two allow simple leverage to open at the knees. The gentleman is Rex Beynon, who taught me Polarity Therapy. He is based at Seren Retreat, Gower Swansea. |
 |
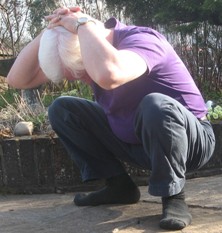
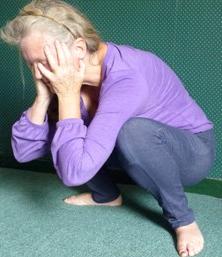
This third posture allows clenching and releasing of the
fists and arms, whilst rocking, and is said to be useful for emotional release. Feel the difference that your head position as well as hand position makes to the different groups of muscles. |
Now let's add in some other stretches for the spine & neck
 |
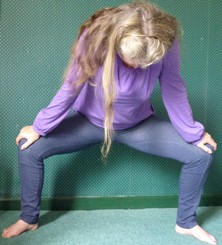
 Again, let's have Rex demonstrate as well. This is the same wide stance of the Youth Posture but increasing the stretch on the spine through the neck and back by GENTLY pulling on the crown of your head. This time just use the forward/back rocking, and notice how your deep breaths gently encourage the stretch. John Beaulieu in 'Polarity Therapy Workbook' suggests also pulling head towards one side then the other. |
 |
Now for stretching each side of the neck, although it's a gentle pull, its effects are transmitted down one side of the body then the other. After these stretches, when the body is relaxed, Dr Stone encouraged grasping a bar and hanging from it for a minute or so, thus your body experiences a new stretch in a different way. One day I'll get around to 'installing a one-and-a-half inch curtain pole in any doorway'. |
These next two holds are pulls rather than pushes, and we discover the power of HUMMING
 |
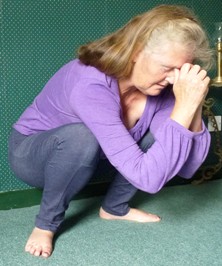
Locking your fingers you are able to use a little squeeze through the heels of your hand and give an uplift each side of the head. Where do I place my hands? Perhaps you'll find a sore spot on one side or both, use this spot and its corresponding position on the other side. You may squeeze in time with your breath, and also we now introduce HUMMING, a beautiful vibration that encourages and releases inside you. Find the hum pitch and loudness that feels right for you now. |
 |

Let's develop this type of lift in a diagonal direction, with one hand on your forehead over one eye Enjoy your humming! ...and again keep the pressure MILD, your hands are an encouragement, not a vice! |
Let's give the eyes, ears and mouth some exercise whilst in the Youth posture!
 |
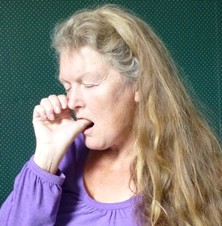
Your little fingers are right under the brow bone, gently pressing on the eyeballs. Hold briefly wherever you find soreness or Now hum, experiment and you'll probably find a higher pitch sound really 'hits the spot' in this delicate area. Each hold is usually only a few seconds, but up to a minute is possible. Note the general position of the hands, palms cupping the cheeks down to the jaw with thumb under your ear. Very comfortable...and comforting. Handy hints: cut your little-finger nails! Also, you may have sore spots a little behind your ears on the bone there, if so, place your thumbs here (fingers supporting forehead) and find the right humming sound to get a response (not shown). I enjoy a sideways rocking motion with this Youth Posture. |
 |
EARS The first hand position for your ears is with the little finger inserted into the ears with a lifting and widening intention. Insert carefully, as far as is still comfortable, bet you're glad you cut those nails.... Open and close your mouth and you'll feel the jaw action under your little fingers. Hum, finding the right pitch and volume, see how opening your jaw changes the vibration. Am I doing the humming right? Ideally, you're looking for a place of resonance, especially in the area of any disorder. The right pitch/tone/volume will be experienced as if that area is responding more, vibrating in tune/alignment with your humming. Relax, experiment and have fun! |
 |
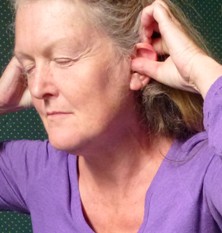
The second position is with your thumb in the ear canal. Turn your hand upside down so the fingers are behind the ear, and use your index finger to pull and twist the lobe, humming to again find the resonance that will help this area to vibrate. Do you need also to cut your thumb nails? |
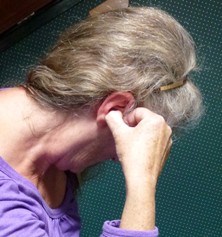 |
The final ear exercise has the thumb in the ear with the rest of the hand in front, with the thumb and index finger this time holding and manipulating the tragus. The what? That's the anatomical name for the half-moon-shaped part of the ear that curves at its front. I'm writing this in 2012, and ear-piercing of the tragus (rather than the ear-lobe) has recently started so perhaps the word will soon be more familiar. How do I hold the tragus? Again the pulling and twisting to encourage opening and tension, to increase resonance.
|
| Whilst working with the ears, I enjoy 'beating the heavenly drum' (Not a Polarity Posture, it's just that I love it). Gently cup the palms of your hands and lightly cover your ears with them, your fingers will be facing backwards. Place your index fingers over the back of your middle fingers. Apply a little pressure with the index fingers, then let them 'ping' off the middle fingers back to the side of your head, and discover why this exercise is so-named. (not depicted by any photo here) | Time now for working with the roof of the
mouth, the hard palate. Explore the area with your thumb, paying
particular attention to any sore or tender or more sensitive spots.
Pause in those areas and press more firmly, you can also bring in a
circular massaging action
 or
pressure-release motion. Your thumb won't be actually moving over
the spot but staying on the position whilst the circling or
pushing motion is applied. or
pressure-release motion. Your thumb won't be actually moving over
the spot but staying on the position whilst the circling or
pushing motion is applied. Dr Stone wrote that this area reflects the whole body, just like the foot or hand does in reflexology. The front denotes the front of the body, the back is the back of the body. The centre reflects the area within the body, and each side reacts for the sides of the body. Furthermore, he discovered that using the thumb from the same side of the body is soothing, using it on the other side is stimulating. |
 |
Let's finish this selection of Youth Posture variations with the frog stance. By putting your fingers under your instep, you join up the circuit of your energy body. It can feel good to gently rest the tip of your tongue against the gum-line of your top two front teeth, so completing another energy circuit there. Take time to reflect on the session, and to give thanks to our Creator for each breath, every heartbeat, and each one of the myriad nerves, muscles and energy circuits in your glorious body. Thank you God. |
 tightness, however
the action is more upwards than into the eyeball.
tightness, however
the action is more upwards than into the eyeball. That brings us to the end of the range of suggested Health and Youth Postures.
How often or long should I do each posture? A simple 5-minute routine perhaps twice a day could work wonders in balancing the energy currents of the body and encourage health. Choose 4-6 postures and enjoy them for about a minute each, perhaps varying them as you wish. The stretches for the spine and neck, and those for the eye and ears are particularly valuable if you have physical problems in those areas. You can think of the mouth exercises as a general restorative at an energy or reflex level.
Now let's experience other squatting exercises, firstly ones using supports then ones using wide stances.
Polarity Postures
using supports such as tables & chairs.Although useful for everyone, some of these postures are particularly useful for less-mobile people. They could quite simply become part of anyone's daily life, eg when getting up out of a chair. For people with desk jobs, adding some of these moves as part of, say, an hourly relaxing and stretching regime, could be useful and healthy.
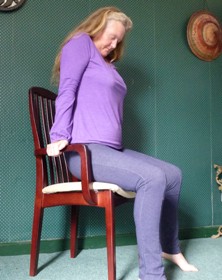 |
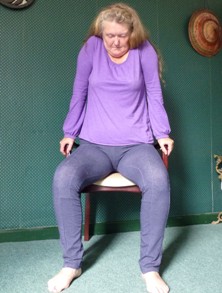
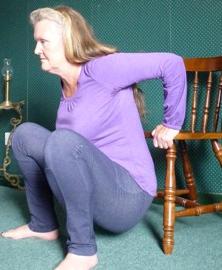
Use the arms on your chair to push up with your arms, lifting your shoulders and letting tension and compression release from your spine. You only need to raise yourself slightly to take your weight in this way. Drop your head to increase the stretch. |
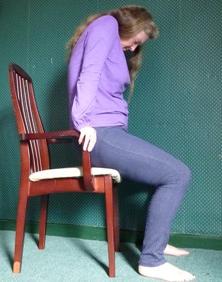 |
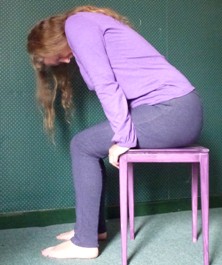
Experiment by moving further forward on the seat. And on the right, here's another variation of the Youth Posture. The support of the chair allows the spine to extend and release, as well as putting in other interesting stretches. John Beaulieu in 'Polarity Therapy Workbook' calls this posture the 'Cliffhanger'. He suggests using 'deep abdominal breaths, and, as you exhale make deep "AAH" sounds. Slowly bring your body back up to a standing posture. Close your eyes and take a moment to feel the still point, ..' |
 |
Left: Using a bench or table, lean forward, allowing your head to drop, and rock gently back and forth on straightened arms. Right, carefully leaning back on straightened arms, head dropped forward. Hold tight, and, if secure, pull from your shoulders through to your hands, relaxing and repeating the stretch. Stable table warning, ensure the table can take the weight and remain stable! I'm using a small table, a solid coffee table would be very good, if tall enough. A firm bed, of the right height could also be used. |
 |
 Two more variations of the Youth Posture, ('cliffhanger') using a table instead of the chair (above, left). Experiment with different distances from your heels to the table legs, and feel the extra stretch when you lean forward. With the weight of the body hanging from the shoulders, you can rock back and forwards as well as sideways. You may adapt this stance for supports of different heights. Try the kitchen worktop for a high-level version...whilst you wait for the kettle to boil. |

Wide stance postures in polarity yoga for health .
 |
Feel the stretch on your hips as well as shoulders and back. Side-to-side rocking facilitates release through this posture. |
 |
In this variation your arms are straight so the shoulders are pushed upwards, and you drop your head forward.
Now let's put in some lovely twists...... |
 |
 In the central position breathe in, as you breathe out twist to look back and up over one shoulder, thus straightening the opposite arm. You have made a beautiful diagonal line. Continue the twist as far as comfortably possible. Breathe in. Then, keeping the body in that position, as you breathe out, turn the neck so you gaze down your arm towards your knee, looking down that diagonal. Continue to turn the head further around to maximise the neck-stretch. Breathe in. On breathing out, return to centre, then repeat in the other direction. |
I hope you have enjoyed these squatting polarity postures. Do let me know. If there's enough interest (and I have enough time) I could add other pages of useful exercises advocated by polarity practitioners.
Link to my Polarity Therapy page.
Please be self-aware. These exercises/yoga postures are used daily by many people, but if you have doubt about your ability to carry them out, or the advisability of doing so, please check with your doctor before starting. I, Carrie Thomas, am not a doctor, so I have no expertise in diagnosing, or in knowing the likely effect of any specific exercise on your medical condition/s.
When participating in any exercise program, there is the possibility of physical injury. Always stay comfortably within your limits, starting in small stages and building up gradually to longer times and lower stances. Go as far as a 'nice stretch', not as far as any pain. Forget 'no pain no gain', instead love yourself and your body and keep well within its limits and your enjoyment level. If a certain posture doesn't suit you, don't do it. You are your body's best friend, listen to it, don't push or force it. If in doubt, don't. If in doubt...IMAGINE doing them, that can also help.
© Carrie Thomas, Touchwood